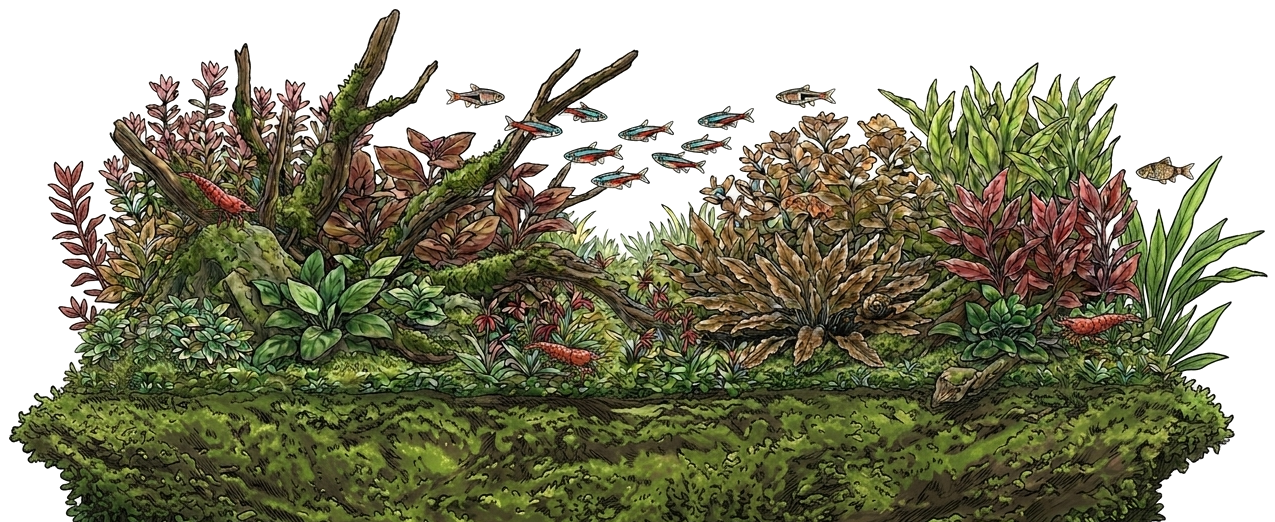
180-Gallon High-Tech Walstad Aquascape (Advanced)
A 180-gallon Walstad-method tank: a nutrient soil base under a cap, heavy planting, and a system built to look after itself. It is a large display tank, wide enough that the layout has to work across the whole span. Pressurised CO2, active soil and real light — faster growth, more colour, and a tank that needs you every week. 10 plant species, Spiderwood, and 5 livestock groups checked against each other for compatibility — every quantity below sized to 180 gallons and every plant chosen for an advanced.
Generate this exact design in the studio →
More than a design — your whole aquarium, handled
Everything below is generated for this 180-gallon Walstad build — 10 plants, 5 livestock groups, and gear sized to 180 gallons. The studio does the same for your tank, free.
Hardscape — what to buy and how to place it
Spiderwood is pale bleached azalea root — a compact knot with many fine roots spreading out of it and tapering to hair-thin ends. Tannin release is mild and short-lived, so the water stays largely clear. Two things happen early and both are normal: it floats until it waterlogs, so weight it down for the first week or two, and it grows a white fuzzy biofilm within days of going under. The biofilm is a harmless fungus that feeds on the wood sugars — shrimp, otocinclus and snails eat it, and it disappears on its own within a few weeks.
At 180 gallons, plan on seven or more pieces in clearly unequal sizes. An odd count is easier to compose, and one piece should obviously lead — a group of similar-sized pieces spread evenly across the tank is the most common way a first scape goes flat.
A Walstad tank is driven by the soil and the plants, so the hardscape stays deliberately minimal — a piece or two for structure and shade, placed to leave the substrate open where roots want to run.
Substrate
Aqua soil (e.g. ADA Amazonia / UNS Controsoil), built to about 3–4" and sloped higher at the back. Active soil buffers soft, slightly acidic water and feeds roots. Slope higher at the back for depth.
Fresh aqua soil leaches ammonia for the first one to three weeks. That is normal and it is also why you do not stock a high-tech tank early: run it, change a good volume of water two or three times in that first fortnight, and wait for ammonia and nitrite to read zero before any livestock goes in.
Because this plan carpets the foreground, keep the front of the substrate shallow and level — around an inch is plenty — and save the depth for the back. Carpets are planted into a flat bed in small clumps a couple of centimetres apart, and they spread sideways to meet; planting them dense enough to look finished on day one wastes plants and traps debris.
Micro Sword, Cryptocoryne beckettii 'Petchii', Cryptocoryne lutea, Echinodorus amazonicus and Amazon Sword are root feeders rather than water-column feeders, so they want depth and a root tab more than they want dosing. Give that part of the bed the extra depth.
At 180 gallons the substrate is a real purchase, not an afterthought — budget for it early and buy it all at once, because a bed topped up later with a different bag rarely matches.
Plant list & placement
Plant back to front, into damp substrate with the tank only part-filled — it is far easier than fighting buoyancy in a full tank. Hornwort is the tallest thing in this plan at around 24", so it sets your back row and everything else steps down in front of it.
Fairy Moss (Azolla) is the fast grower here — tiny fern-like floater; reddens in strong light, fast nutrient sponge. Expect to be cutting it weekly once it establishes. Top the stems, replant the healthy tops in the same group and discard the old bases; a stem bed replanted from tops stays dense, while one left to grow on goes bare at the bottom.
Fairy Moss (Azolla) and Java Moss are epiphytes and must never be buried. Tie or glue the rhizome onto your hardscape and leave it fully exposed — a buried rhizome rots, and it is the single most common way a beginner loses an Anubias or a Java fern. Only the roots may touch the substrate.
Fairy Moss (Azolla) and Hornwort sits on the surface, which does two useful things and one inconvenient one: it shades the tank, which calms most fish and suppresses algae, and it strips nitrate fast — but it also cuts the light reaching everything below, so thin it out by hand whenever it covers more than about half the surface.
Group the stems rather than spacing them out. Bacopa caroliniana, Bacopa monnieri and Echinodorus amazonicus each want to be planted as a block of stems an inch or so apart, cut to slightly different heights so the group fills in with a rounded top instead of a flat hedge.
Stocking
This stocking is built to spread through the tank rather than crowd one layer: Chili Rasbora and Lambchop Rasbora share the open middle water, Honey Gourami works the surface and Julii Cory works the floor. A tank where every fish occupies the same band looks half-empty even when it is fully stocked, and the fish themselves compete more.
Keep Chili Rasbora in 8 or more, Julii Cory in 6 or more and Lambchop Rasbora in 8 or more. These are not decorative numbers — a shoaling fish kept in threes spends its life stressed, colours down and hides, and people then conclude the species is dull. The counts in the list above are already scaled to this tank.
Honey Gourami is the centrepiece. Gentle, smaller and far more peaceful than dwarf gourami; great centerpiece.
Olive Nerite Snail is the clean-up crew, and in a planted tank it earns its place — grazing biofilm and soft algae off the hardscape and leaves faster than you can. Add it last, once the tank has some algae to eat, and drip-acclimatise rather than dumping the bag in.
- Chili Rasbora — Keep Chili Rasbora in a group of at least 8 — kept in ones or twos they get stressed, shy, and nippy.
- Honey Gourami — Honey Gourami is territorial/solitary — best kept as a single specimen.
- Julii Cory — Keep Julii Cory in a group of at least 6 — kept in ones or twos they get stressed, shy, and nippy.
- Lambchop Rasbora — Keep Lambchop Rasbora in a group of at least 8 — kept in ones or twos they get stressed, shy, and nippy.
The largest fish here is roughly 2.9× the length of the smallest, which is the point at which size alone starts to matter — that gap was checked against mouth size and feeding behaviour, not just temperament. Every pairing was run through Skapelab’s compatibility engine and anything returning even a caution was swapped out rather than published. Check any substitution you make there before you buy.
Equipment
| Category | Recommendation | Notes |
|---|---|---|
| Filtration | Fluval FX4 High Performance Canister | ~$265–340 |
| Co2 | GreenLeaf Aquarium GLA Regulator + 20lb Cylinder | ~$400–510 |
| Fertilizer | Estimative Index DIY NPK Dry Ferts Kit | ~$28–45 |
| Testkit | API Freshwater Master Test Kit | ~$28–42 |
| Water treatment | Seachem Prime 500ml | ~$12–20 |
| Bacteria | Seachem Stability 250ml | ~$8–14 |
What the first two months look like
| Week 1 | Hardscape in, planted, filled and running with no livestock. CO2 comes on an hour before the lights and off an hour before they go out; aim the drop checker at a green, never yellow. Your Spiderwood will still be trying to float, so keep it weighted or clipped down until it waterlogs. |
| Weeks 2–4 | Cycling, and the ugly phase. Brown diatom dust on the glass and hardscape is normal in a new tank and passes on its own once silicates are used up; the fresh soil is also still releasing ammonia, so keep changing water. Some plants will melt back and regrow in their submersed form — that is conversion, not death, so trim the mush and leave the roots. Do not stock until ammonia and nitrite both read zero. |
| Weeks 4–6 | Stocking begins, a few animals at a time with a fortnight and a water test between additions. The first real trim happens somewhere in here, and the tank stops looking newly planted. |
| Months 2–3 | The soil settles into balance and the tank starts running itself. This is the point where a Walstad tank rewards having been left alone: stable, undemanding, and needing less from you each month rather than more. |
Care schedule
| Daily | Feed lightly — as much as they clear in a minute or two — and take ten seconds to count heads and look at the plants. Check the drop checker is green before the lights come on. |
| Weekly | 40% water change — about 72 gallons on this tank — using a tap-fed water changer — at this volume buckets stop being realistic. Dose your macros and micros after the change, not before. Wipe the glass and check the CO2 cylinder pressure. |
| Monthly | Rinse filter media in old tank water — never under the tap, which kills the bacteria colony you spent six weeks growing. Test KH, GH, pH and nitrate. On a tank this size also check the seals and the stand for damp, because a slow leak here is a floor problem, not a tank problem. |
| Every few months | Replace the CO2 diffuser membrane, check the regulator has not crept, and pull the deepest stems for a hard replant. Lights lose output long before they fail — plan on replacing LEDs or bulbs on a schedule, not on symptoms. |
Make it yours
This is a starting point. Open it in the studio to swap plants, resize to your tank, and get a hand-illustrated render, placement diagram, and shopping list — free.
Start this build →